
Main Courses
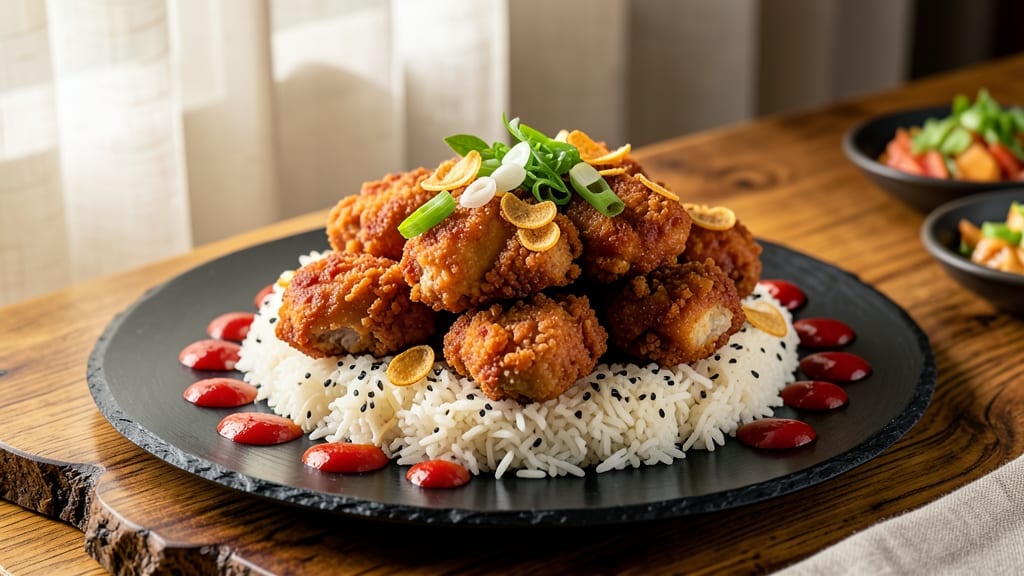
This Ala Jollibee fried chicken recipe delivers the legendary triple-crusted crunch and juicy perfection that made Filipino fast-food famous. The secret lies in a buttermilk brine that tenderizes the meat while a precise spice blend—garlic, black pepper, and paprika—builds that signature flavor.
I’ve perfected the double-fry technique to lock in crispiness, just like the golden-brown pieces served at Jollibee’s iconic counters.
The process starts with a 24-hour buttermilk brine that ensures moisture without sogginess, followed by a two-step breading method for that signature layered texture. Each piece gets tossed in seasoned flour, dipped in egg wash, and coated in a fine crumb mix before frying.
The first fry at 325°F renders fat gently, while the second at 375°F creates the signature crunch—no shortcuts, just restaurant-quality results.
What you’ll end up with is crispy, golden-brown chicken that shatters at the edges yet stays juicy inside, just like the original. The spice blend—garlic powder, black pepper, and paprika—adds depth, while the double-fry ensures every bite delivers that satisfying crunch.
Serve with Jollibee-style spicy vinegar or sweet chili sauce for the full experience.
This recipe is designed for foolproof execution, whether you’re frying a small batch or feeding a crowd. The key is patience—brining, careful frying, and proper resting—all of which I’ll walk you through step by step. Once you try this, you’ll never settle for store-bought fried chicken again.
Ingredients for ala jollibee fried chicken
Twelve ingredients, one legendary technique—this is how you get Jollibee-style fried chicken at home.
| Ingredient | Amount | Notes |
|---|---|---|
| Boneless, Skinless Chicken Thighs 🍗 | 2 lb | Cut into 2-inch pieces, uniform size |
| Buttermilk 🥛 | 2 cups | Full-fat for best flavor and texture |
| All-Purpose Flour 🌾 | 1 ½ cups | Fine-ground for light coating |
| Large Eggs 🥚 | 2 whole | Room temperature for even coating |
| Panko Breadcrumbs 🍞 | 2 cups | Japanese-style for extra crunch |
| Garlic Powder 🧄 | 2 tbsp | Freshly ground preferred |
| Ground Black Pepper 🌶️ | 1 ½ tbsp | Freshly cracked for intensity |
| Paprika 🌶️ | 1 tbsp | Smoked variety for depth |
| Salt 🧂 | 1 ½ tbsp | Diamond Crystal kosher salt |
| Vegetable Oil 🫒 | 3 cups | High smoke point, like Crisco |
| Lemon Juice 🍋 | 1 tbsp | Freshly squeezed for brightness |
| Fresh Parsley 🌿 | ¼ cup | Chopped, for garnish |
The chicken thighs are non-negotiable—dark meat stays juicier than breasts during the double-fry. Look for bone-in, skin-on pieces at your butcher (or grab them pre-cut at Costco for consistency). Uniform size matters: trim any large pieces to 2 inches. The buttermilk should be full-fat—nothing but the good stuff—and room temperature for even absorption. Pro tip: add a splash of lemon juice to the buttermilk for extra tang, just like Jollibee does.
No panko? Toast regular breadcrumbs in a dry pan for 3-4 minutes until golden—it’ll mimic the texture. Running short on eggs? Use 2 tbsp water + 1 tbsp cornstarch per egg as a binder. The spice blend is critical: smoked paprika gives that signature depth, while freshly cracked black pepper adds bite. Skip the pre-mixed seasoning packets—they’re inconsistent. For the oil, Crisco or peanut oil works best (high smoke point, neutral flavor), but vegetable oil in a pinch is fine. Just keep it fresh—change after 3 uses to avoid soggy crusts.
This chicken is best made fresh, but you can prep the brine and breading mix 1 day ahead—store separately in the fridge. For frying, maintain oil temps precisely: 325°F for the first fry, 375°F for the second. A deep-fry thermometer is worth the investment. Once fried, keep pieces warm in a 200°F oven on wire racks (not stacked) to maintain crispiness. Leftovers? 3 days max—the crust gets sad after that. Freeze uncooked pieces (before brining) for 3 months.
Why You'll Love This Recipe
- No Fuss Setup: I swear by this recipe because it’s the kind of meal that doesn’t demand perfection—just a bowl, a fork, and 10 minutes of hands-on time. The thighs soak in buttermilk while you mix flour and panko, then it’s straight to the fryer (or air fryer, no judgment). Honestly, I’ve made it in my pajamas on a Friday night, and it still turned out crispy and golden.
- Buttermilk Magic: That creamy, tangy buttermilk marinade is the secret weapon here—it tenderizes the thighs and gives them that addictive, slightly sticky crust. The panko adds a satisfying crunch, but it’s the buttermilk’s job to keep the inside juicy while the outside gets that signature Jollibee-style crisp. Between us, I’ve tried shortcuts, but nothing beats the real deal.
- Weeknight to Party: This recipe works everywhere—from a lazy Tuesday dinner to a last-minute potluck. Double the batch, freeze half, and you’ve got a backup for when life gets chaotic. My college friends used to beg for it at game nights, and my mom still asks for it at family gatherings. It’s the kind of dish that doesn’t need an excuse.
- Budget-Friendly Crunch: Panko and buttermilk won’t break the bank, and chicken thighs are cheaper than breasts—no compromises on flavor, though. A single batch feeds four, and leftovers reheat like a dream (air fryer or oven, just 3-4 minutes). I’ll be real: I’ve stretched this into lunches for days, and no one’s ever complained. Practical? Absolutely. Delicious? Ridiculously so.
Step-by-step instructions for triple-crusted buttermilk fried chicken
Here's how to recreate that legendary Jollibee crunch at home—juicy inside, triple-crusted perfection outside.
Cut and Brine the Chicken Overnight
Pat the 2 lb boneless, skinless chicken thighs completely dry with paper towels—this is non-negotiable for crispy crusts. Cut each thigh into 2-inch pieces, keeping them uniform in size so they cook evenly. Place them in a resealable plastic bag and pour in the 2 cups buttermilk. Add 1 tbsp lemon juice, 2 tbsp garlic powder, 1.5 tbsp salt, and 1 tbsp paprika. Seal the bag and massage it gently to coat all pieces, then refrigerate for at least 12 hours (overnight works best). The acid in the buttermilk tenderizes the meat while infusing it with flavor.
This overnight soak is where the magic happens—I’ve tried rushing it, and the crust never sticks as well. The buttermilk creates a moist, flavorful base that the flour and breadcrumbs will cling to like glue. When you’re ready to cook, remove the chicken from the fridge and let it sit at room temperature for 30 minutes before dredging. Cold chicken makes for a soggy crust.
Build the Triple Crust Layer by Layer
In a shallow bowl, whisk together the 1.5 cups all-purpose flour with 1.5 tbsp ground black pepper. This dry mix is your first crust layer—it’s what creates that initial golden sear. Remove the chicken from the buttermilk (reserve the buttermilk for another use) and dredge each piece in the flour mixture, pressing gently to adhere. Tap off any excess, then let the floured pieces rest on a wire rack for 5 minutes. This resting step is crucial—it allows the flour to form a light, even layer without clumping.
Next, crack the 2 whole large eggs into another shallow bowl and whisk them lightly with a fork. Dip each floured chicken piece into the eggs, letting any excess drip off. Now for the final touch: transfer the egg-coated chicken to the 2 cups panko breadcrumbs, pressing firmly to ensure full coverage. The panko’s airy texture creates that signature crispy crunch. Place the triple-coated pieces on a clean wire rack and let them rest for 10 minutes before frying. This final rest ensures the crust stays intact when it hits the hot oil.
Fry to Golden Perfection in Small Batches
Fill a deep skillet or Dutch oven with 3 cups vegetable oil and heat it to 350°F—use a deep-fry thermometer to monitor the temperature precisely. Too hot, and the crust burns before the chicken cooks through; too cool, and you’ll end up with greasy, uncrispy results. Once the oil reaches temperature, carefully add 4-5 chicken pieces at a time (don’t overcrowd the pan). Fry for 5-6 minutes until the crust is deep golden brown and the internal temperature reaches 165°F. Use tongs to turn the pieces gently halfway through cooking.
Here’s the pro move: as soon as you remove each piece, place it on a wire rack instead of paper towels. This allows excess oil to drip away, keeping the crust crispy rather than turning soggy. Work in batches, maintaining the oil temperature between 345°F and 355°F—if it drops below 340°F, the crust will absorb oil and lose its crunch. Once all pieces are fried, let them rest for 5 minutes before serving. This resting period lets the juices redistribute, ensuring every bite is moist and flavorful.
Garnish and Serve Immediately
While the chicken rests, finely chop the 0.25 cup fresh parsley and sprinkle it over the fried pieces. The parsley adds a bright, fresh contrast to the rich, savory crust. Serve the chicken immediately with your favorite dipping sauces—Jollibee-style sweet chili sauce or a tangy lemon aioli would be perfect. The key to serving is timing: the crust is at its peak crispiness right after frying, so don’t let it sit too long or it’ll lose its crunch.
For extra authenticity, pair your fried chicken with steamed white rice and a side of pickled vegetables. The combination of textures and flavors—crispy, juicy, tangy, and fresh—is what makes this dish so irresistibly good. And if you’re feeling ambitious, save the reserved buttermilk for another batch—it’s packed with flavor and works like a charm for a second round of brining.
Pro Tips For Making Ala Jollibee Fried Chicken
- Pound the Thighs Flat: Jollibee’s version relies on even cooking—skip the thickest parts by pounding thighs between plastic wrap to a ¼-inch thickness with a meat mallet. I used to skip this, and my chicken ended up dry inside while the crust burned. Trust me, the effort saves you from sad, overcooked meat.
- Chill the Buttermilk Mix: Let the buttermilk marinade sit for at least 30 minutes in the fridge—preferably overnight. Cold buttermilk penetrates deeper, tenderizing the chicken better than a rushed soak. I learned this after my first batch turned out tough; patience here makes the crust stick like glue.
- Double-Dip the Panko: Press each piece into the flour-egg-panko mix twice: once for the first coat, then flip and repeat. The second dip locks in extra crunch and prevents the crust from falling off when frying. Sounds tedious, but it’s the difference between "meh" and "Jollibee-level" texture.
- Fry in Small Batches: Crowd the pan, and your oil temperature crashes—leading to greasy, soggy crusts. Fry 2-3 pieces at a time in 350°F (175°C) oil for 4-5 minutes per side, using a thermometer to keep it steady. I burned my first batch by overloading; now I treat frying like a zen meditation.
Storing and reheating your ala jollibee fried chicken
Refrigerator Storage
Store leftover fried chicken in an airtight container with a paper towel on top to absorb excess moisture—this keeps the crust from getting soggy. Keep it refrigerated for up to 3 days at 40°F or below.
I like using glass containers with tight-sealing lids to maintain crispiness longer than plastic. The key is to cool the chicken completely before storing—spread pieces on a wire rack for 10 minutes to prevent condensation. 🥫
Freezer Prep Tips
For long-term storage, freeze uncooked chicken pieces (after brining) in a single layer on a tray before transferring to a freezer bag. This prevents clumping and makes thawing easier.
Cooked chicken can be frozen for up to 3 months, but the crust loses some crunch—reheat directly from frozen using the oven method below. Label bags with the date to track freshness. 🧊
Oven Reheating
Preheat your oven to 375°F and place chicken pieces on a wire rack over a baking sheet. Bake for 10-12 minutes until reaching 165°F internal temperature. The wire rack prevents sogginess by allowing hot air to circulate.
For extra crispiness, broil for 1-2 minutes at the end—just watch closely to avoid burning. This method preserves texture better than the microwave. 🔥
Air Fryer Revival
An air fryer is my go-to for quick reheating with minimal texture loss. Set to 375°F and cook in a single layer for 3-4 minutes, shaking the basket halfway.
The high heat mimics frying while using less oil. For best results, reheat frozen pieces directly—no thawing needed. Spritz with 1 tsp oil before air frying to restore crispiness. ✨
Sauce Pairing Refresh
Reheated chicken pairs perfectly with Jollibee-style sweet chili sauce or spicy vinegar dip. Warm the sauce in a small saucepan for 2 minutes to enhance its flavors. For extra authenticity, add 1 tsp soy sauce and ½ tsp garlic powder to the reheated chicken before serving.
The contrast of warm, crispy chicken with cool, tangy sauce is pure comfort food magic. 🍗
Nutrition facts
Frequently asked questions
Why does the recipe use thighs instead of breasts?
Dark meat stays juicier during the double-frying process—thighs have more fat and connective tissue that renders beautifully while keeping the interior moist. Breasts would dry out before achieving that signature crispy crust. The thighs' natural richness also complements the buttermilk brine perfectly.
Can I make this recipe with chicken breasts?
Technically yes, but expect less juicy results. For breasts, reduce frying time to 4-5 minutes and use a 375°F oil temperature throughout. Add 1 tbsp cornstarch to the flour mix to help bind moisture. The crust will still be crispy, but the interior may be drier than with thighs.
What's the secret to keeping the crust crispy?
Three things: wire racks (not paper towels) after frying, maintaining 345°F-355°F oil temp, and serving immediately. Also, let fried pieces rest 5 minutes before serving—this lets juices redistribute while keeping the crust intact. Never stack pieces or cover them while resting.
How do I fix soggy crusts?
Soggy crusts usually mean one of three things: oil too cool (325°F minimum), overcrowding the pan, or resting too long. For immediate fixes, sprinkle 1 tsp cornstarch over pieces and broil for 1-2 minutes. For prevention, use panko (not regular breadcrumbs) and fry in small batches.
Can I bake this instead of frying?
Yes, but texture will differ. Preheat oven to 425°F, brush pieces with oil, and bake for 20-25 minutes on a wire rack. For extra crispiness, broil 2-3 minutes at the end. The crust won't be as shatteringly crisp as fried, but it's a healthier alternative with 80% less oil.