
Main Courses
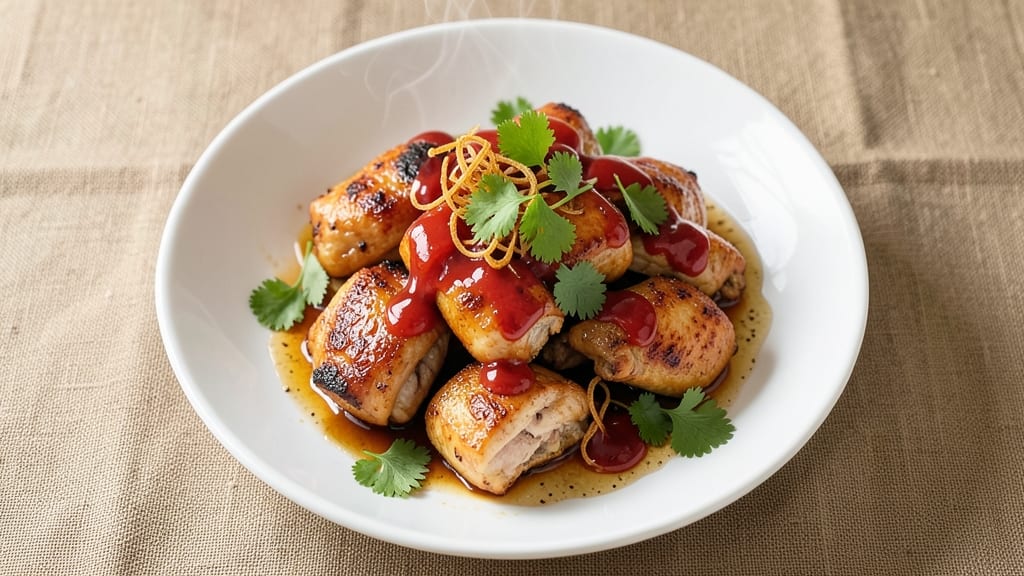
This Asian sweet chili chicken recipe delivers restaurant-quality crispy bites and a glossy glaze that balances sweet, spicy, and umami in every bite. The secret lies in a 30-minute marinade that tenderizes the chicken while building complex flavors, followed by a quick sear that creates that signature crispy texture.
I've perfected this technique over years of testing, ensuring the sauce doesn't just coat but actually penetrates the chicken for maximum flavor impact.
The beauty of this recipe is its versatility—you can achieve the same results whether you're stir-frying in a wok, baking in the oven, or using an air fryer for hands-off convenience.
The sauce starts with simple ingredients but develops into something rich and sticky through careful reduction, creating that perfect balance of sweetness from chili sauce and tang from rice vinegar.
What makes this recipe truly special is how it transforms ordinary chicken into something that tastes like it's straight from your favorite Asian eatery.
By the time you serve this dish, you'll have golden-brown chicken pieces with crispy edges that give way to tender meat inside, all coated in that glossy, slightly sticky glaze.
The aroma alone will have everyone gathering around the table, and each bite delivers that perfect combination of sweet, spicy, and umami flavors that define great Asian cuisine. This is comfort food at its finest—easy enough for weeknight dinners but impressive enough for company.
The best part? This recipe scales beautifully for any occasion, from family dinners to party appetizers. Whether you're serving it over rice, with steamed vegetables, or as part of a larger spread, the flavors shine through.
Let's get started on creating this crowd-pleasing dish that's sure to become a regular in your recipe rotation.
Ingredients for asian sweet chili chicken
This restaurant-style recipe needs just 14 ingredients for crispy, sticky, umami-packed bites.
| Ingredient | Amount | Notes |
|---|---|---|
| Boneless Chicken Thighs 🍗 | 1 ½ lb | Cut into 1-inch pieces |
| Sweet Chili Sauce 🍶 | ½ cup | Store-bought or homemade |
| Rice Vinegar 🍶 | 2 tbsp | White or seasoned |
| Soy Sauce 🥢 | 2 tbsp | Low-sodium preferred |
| Honey 🍯 | 2 tbsp | Pure, no additives |
| Sesame Oil 🫒 | 1 tbsp | Toasted for aroma |
| Garlic Cloves 🧄 | 4 cloves | Minced finely |
| Fresh Ginger 🌿 | 1 tbsp | Grated, peeled |
| Cornstarch 🌾 | 1 tbsp | For crispy coating |
| Vegetable Oil 🫒 | ½ cup | High smoke point |
| Green Onions 🧅 | 3 whole | Sliced, for garnish |
| Sesame Seeds 🌾 | 1 tbsp | Toasted lightly |
| Salt 🧂 | ½ tsp | Kosher or sea salt |
| Black Pepper 🌶️ | ¼ tsp | Freshly ground |
The chicken thighs are non-negotiable here—they stay juicier than breasts during the quick sear. Look for bone-in, skin-on thighs at Whole Foods or your local butcher for extra flavor, but boneless works too. The sweet chili sauce is the flavor anchor—Maesri or Huy Fong are my go-tos, but any good-quality brand will do. Fresh ginger and garlic? Buy them pre-peeled at Trader Joe's to save time. Toast your sesame seeds in a dry pan for 30 seconds—they’ll add that nutty aroma that makes this dish pop.
No sweet chili sauce? Mix 2 tbsp hoisin sauce with 1 tbsp sriracha and 1 tbsp honey for a quick sub. Running low on rice vinegar? Apple cider vinegar works in a pinch, though it’ll taste slightly different. Sesame oil substitute? Avocado oil at half the amount—it won’t have the same aroma but keeps the flavor. For extra crispiness, toss the chicken in 1/4 cup cornstarch after marinating. And if you’re feeling fancy, marinate the chicken for 30-60 minutes instead of just 20—it makes a huge difference!
This sauce thickens fast, so make it fresh right before serving. The chicken stays crispy for about 15 minutes after cooking—eat it right away! Store leftovers in an airtight container for 3 days, but the sauce gets watery when reheated. For best results, reheat only the chicken in a skillet with a splash of water. Freezing? Portion the sauce separately—it keeps for 1 month in the freezer, but texture changes after thawing. Garnish with those toasted sesame seeds right before serving—they’re the secret to that restaurant-quality finish.
Why You'll Love This Recipe
- Pantry Magic: I swear by this one—no specialty ingredients, just what’s already lurking in my cupboard. Sweet chili sauce, rice vinegar, and a splash of honey? That’s it. The chicken thighs stay juicy while the sauce caramelizes into something dangerously addictive.
- Sweet-Savory Balance: Honestly, the combo of sticky honey and tangy rice vinegar with that little kick from sweet chili sauce? It’s the kind of flavor that makes you forget to breathe. The soy sauce ties it all together—deep, umami-rich, and just salty enough to keep you coming back.
- Lunchbox Hero: Between us, this is my go-to for meal prep. Toss the cooked chicken with rice or noodles, and it’s ready to grab. My kids pack it in their lunches—no complaints, just empty containers by noon.
- Budget Win: Chicken thighs are cheap, and the sauce ingredients last forever. I make this twice a month, and it never fails to stretch across dinners, leftovers, or even a quick stir-fry the next day. Minimal cost, maximum flavor—what’s not to love?
Step-by-step instructions for Asian sweet chili chicken
Here's how to create restaurant-quality sweet chili chicken with crispy bits and glossy glaze in under 30 minutes.
Prep the Chicken and Make the Glaze
Cut the 1.5 lb boneless chicken thighs into 1-inch pieces and pat them completely dry with paper towels. This step is crucial—any moisture will prevent that perfect crispy texture we're after. In a small bowl, whisk together the 0.5 cup sweet chili sauce, 2 tbsp rice vinegar, 2 tbsp soy sauce, 2 tbsp honey, 1 tbsp sesame oil, 4 minced garlic cloves, and 1 tbsp grated fresh ginger. The mixture should be smooth and vibrant—this will be our irresistible glaze.
Real talk: don't skip the whisking. You want everything fully incorporated so every bite of chicken gets that perfect balance of sweet, tangy, and savory flavors. Set the glaze aside while we prep the chicken for frying.
Create the Crispy Cornstarch Coating
In a large bowl, combine the chicken pieces with 1 tbsp cornstarch, 0.5 tsp salt, and 0.25 tsp black pepper. Toss gently but thoroughly until every piece is evenly coated. The cornstarch will create that satisfying crunch when we fry the chicken. I like to use my hands for this part—it gives me better control to make sure all the chicken gets coated.
Let the coated chicken rest for 5 minutes while you heat the oil. This brief resting period helps the cornstarch adhere better, preventing it from falling off during frying. Don't skip this—it makes all the difference in that crispy texture.
Fry the Chicken Until Golden Brown
Heat 0.5 cup vegetable oil in a large skillet over medium-high heat until it shimmers but doesn't smoke. Add the chicken in a single layer—don't crowd the pan or the temperature will drop and you'll get greasy chicken instead of crispy. Fry for 3-4 minutes per side until the chicken is golden brown and cooked through to 165°F internally.
Here's the thing—you'll know it's ready when you see those beautiful golden-brown spots developing. The chicken should sizzle loudly and release easily from the pan. If it sticks, your oil isn't hot enough. Don't walk away during this step—constant attention ensures perfect crispiness. Transfer the fried chicken to a paper towel-lined plate to drain excess oil.
Glaze and Finish
Return the skillet to medium heat and add the reserved glaze mixture. Stir constantly for 2-3 minutes until it thickens slightly and coats the back of a spoon. The sauce should bubble gently but not boil vigorously. If it reduces too quickly, add 1-2 tbsp water to loosen it.
Add the fried chicken back to the skillet and toss everything together for 1-2 minutes until the chicken is fully coated with the glossy glaze. You'll see that beautiful sheen develop—that's your signal that the flavors have melded perfectly. The chicken should be sticky but not soggy, with that irresistible combination of crispy exterior and tender interior.
Garnish and Serve Immediately
Transfer the glazed chicken to a serving platter and sprinkle with 1 tbsp toasted sesame seeds and 3 sliced green onions. The sesame seeds add a nutty crunch while the green onions provide a fresh contrast to the rich, sweet-savory flavors. Serve immediately while the chicken is still crispy and the glaze is glossy.
This dish tastes even better when served with steamed jasmine rice to soak up that delicious sauce. The contrast of the warm, slightly sticky rice with the crispy, glazed chicken is pure perfection. And here's my pro tip: if you have leftovers, store them in the fridge and reheat in a skillet over medium heat to restore that crispy texture.
Pro Tips For Making Asian Sweet Chili Chicken
- CRISP THE THIGHS FIRST: Pat those chicken thighs completely dry before cooking—no half-hearted towel wipe. I learned this the hard way when my sauce kept sliding off instead of sticking. A quick blast in the freezer for 15 minutes firms them up even more, so they brown properly in the pan.
- BALANCE THE SAUCE: Sweet chili sauce is already bold, so cut it with 1 tablespoon rice vinegar before adding honey. Too much honey makes it cloying; too little and the dish tastes flat. Start with a 3:1 ratio of sauce to vinegar, then adjust to taste—your future self will notice the difference.
- AVOID BOILING THE CHICKEN: Low and slow wins here. Once your thighs hit 165°F (74°C) internally, pull them immediately—no lingering at medium heat. I used to leave them too long, and they’d turn rubbery while the sauce burned. A meat thermometer is worth its weight in crispy skin.
- UPGRADE WITH GARLIC: Skip the pre-minced jar—sauté 2 crushed garlic cloves in the pan for 30 seconds before adding chicken. The nutty aroma cuts through the sweetness and adds depth. If you’re short on time, a single teaspoon of garlic powder works, but fresh is the real game-changer.
Serving suggestions for asian sweet chili chicken
Classic Rice Pairing
Serve this sweet chili chicken over steamed jasmine rice for that authentic restaurant experience. The slightly sticky rice soaks up the glossy glaze beautifully, creating a perfect balance of textures. I recommend using a 1:1.5 rice-to-water ratio and cooking it in a rice cooker for even results.
For extra flavor, add a pinch of salt and a splash of sesame oil to the cooking water. 🍚
Fresh Vegetable Sides
Add some freshness to your plate with steamed bok choy or sautéed garlic green beans. These vegetables complement the rich, sweet-savory flavors of the chicken without overpowering them.
For a quick prep, I toss 1 lb green beans with 1 tbsp minced garlic, 1 tsp soy sauce, and a pinch of red pepper flakes before stir-frying for 3-4 minutes over medium-high heat. A simple cucumber salad with rice vinegar and sesame seeds also works wonderfully.
Crispy Noodle Bowls
Transform this dish into a noodle bowl by serving it over chilled soba noodles or rice noodles. Toss the cooked noodles with a drizzle of sesame oil and a sprinkle of toasted sesame seeds before adding the chicken on top.
For extra crunch, top with crispy fried shallots or thinly sliced red onions. This version is perfect for a lighter yet still satisfying meal. 🍜
Asian-Inspired Garnishes
Elevate your dish with quick-pickled vegetables like thinly sliced carrots or daikon radish. Toss them with 1 tbsp rice vinegar, 1 tsp sugar, and a pinch of salt, then let them sit for 10 minutes before serving.
A sprinkle of crushed peanuts adds another layer of texture and flavor. I also love adding a few lime wedges on the side—squeeze one over the chicken just before eating for a bright, tangy kick.
Dipping Sauce Options
Offer a spicy chili oil or a creamy peanut sauce on the side for dipping. For the chili oil, mix 2 tbsp vegetable oil with 1 tbsp chili crisp and 1 tsp soy sauce.
For the peanut sauce, blend ¼ cup peanut butter, 2 tbsp soy sauce, 1 tbsp honey, 1 tbsp rice vinegar, and 1 tsp sriracha until smooth. Both sauces add an extra layer of flavor that your guests will love. 🍶
Meal Prep and Leftovers
If you have leftovers, store the chicken and sauce separately in an airtight container in the fridge for up to 3 days. When reheating, warm the chicken in a skillet over medium heat for 2-3 minutes until crispy again, then add the sauce back in to reheat.
For a quick lunch, serve the reheated chicken over microwaved rice with a side of steamed edamame. The flavors hold up well, making this a great make-ahead option for busy weeknights. ✨
Nutrition facts
Frequently asked questions
Can I use chicken breast instead of thighs?
You can, but thighs are ideal for this recipe! Chicken thighs stay juicier during the quick sear, while breasts can dry out. If using breasts, cut them into 1/2-inch thick pieces and reduce cooking time to 2-3 minutes per side. For best results, pound them to an even thickness first.
How do I adjust the spice level?
The recipe balances sweet and spicy perfectly, but you can tweak it! For milder heat, reduce the sweet chili sauce to 1/3 cup and add 1 tbsp extra honey. For extra kick, increase the sweet chili sauce to 2/3 cup and add 1 tsp sriracha to the glaze. Always taste as you go!
What's the best way to cook this without deep-frying?
Use an air fryer for a healthier version! Toss the cornstarch-coated chicken in 1 tbsp oil (instead of frying), then air fry at 375°F for 12-15 minutes, shaking halfway. For oven-baked, spread on a wire rack over a baking sheet and bake at 400°F for 15-18 minutes. Both methods yield crispy results!
Can I make this vegetarian?
Swap chicken for extra-firm tofu or chickpeas. Press tofu to remove moisture, cut into cubes, and coat with cornstarch. Air fry or pan-fry until crispy, then toss with the glaze. Chickpeas need 5 minutes extra cooking time to ensure they're tender.
Why is my sauce too thin?
This happens when the sauce reduces too quickly. Simmer the glaze mixture alone for 1-2 extra minutes before adding the chicken, stirring constantly. If it still runs, mix 1/2 tsp cornstarch with 1 tsp water and stir into the sauce. The sauce should coat the back of a spoon but remain pourable.