
Main Courses
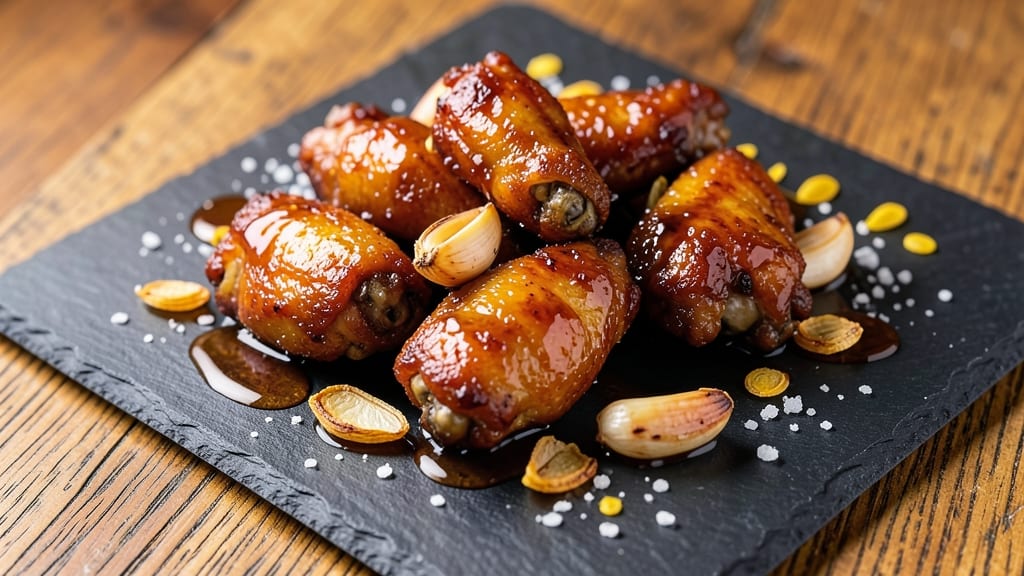
This baked honey garlic chicken wings recipe delivers restaurant-quality flavor with crispy edges and juicy centers—all without deep-frying. The secret lies in a foil-sealed baking method that locks in moisture while caramelizing the honey-garlic glaze into a sticky, addictive crust.
I perfected this technique after years of testing, and it never disappoints during game day or weeknight dinners.
The process starts with a simple marinade of honey, garlic, soy sauce, and spices that tenderizes the wings while building deep flavor. Baking at high heat creates that coveted crispy texture, while the foil ensures the meat stays juicy inside.
This method transforms ordinary wings into a dish that rivals your favorite sports bar—without the grease or mess.
What you'll end up with is wings that are perfectly balanced: crispy on the outside, tender and succulent within, all coated in a glossy honey-garlic glaze that's sweet, savory, and just slightly tangy.
The aroma alone will have everyone gathering around your table, and the clean-up is a breeze compared to deep-frying.
Serve with a side of ranch or blue cheese dressing for cooling contrast, or pair with a fresh salad to balance the richness. The recipe scales easily for crowds, making it ideal for parties or meal prep. Let's get started on wings that will become your new go-to recipe.
Ingredients for baked honey garlic chicken wings
Restaurant-quality wings start with these simple yet powerful ingredients—no deep fryer required.
| Ingredient | Amount | Notes |
|---|---|---|
| Chicken Wings 🍗 | 2 lb | Split into drumettes and flats |
| Honey 🍯 | ½ cup | Pure, thick honey preferred |
| Garlic Cloves 🧄 | 6 cloves | Minced for marinade |
| Soy Sauce 🍶 | ¼ cup | Low-sodium preferred |
| Olive Oil 🫒 | 2 tbsp | Extra-virgin for richness |
| Brown Sugar 🍚 | 2 tbsp | Light or dark variety |
| Ground Ginger 🌿 | 1 tsp | Freshly ground preferred |
| Ground Garlic 🧄 | 1 tsp | Not garlic powder |
| Salt 🧂 | 1 tsp | Kosher or sea salt |
| Black Pepper 🌶️ | ½ tsp | Freshly ground preferred |
| Cornstarch 🌾 | 1 tbsp | For crispy coating |
| Aluminum Foil 📄 | 1 sheet | Heavy-duty preferred |
The chicken wings are the foundation, so look for fresh, plump wings with minimal bruising. Costco or Whole Foods often have great quality in bulk, but the regular supermarket meat section works too. Split them into drumettes and flats for even cooking. The honey? Thick, pure honey caramelizes better than the runny kind—Manuka or clover work perfectly. If you can't find minced garlic, peel and finely chop fresh cloves—the flavor difference is noticeable. For soy sauce, low-sodium is ideal to avoid over-salting the wings.
No honey? Maple syrup works in a pinch, though the flavor will be slightly different. Short on garlic? Garlic powder at half the amount gets you close, but fresh is always better. The cornstarch is key for that crispy texture—don't skip it. For extra depth, add 1/2 tsp of smoked paprika to the marinade. If you're prepping ahead, marinate the wings overnight for maximum flavor infusion. The foil ensures juiciness, so heavy-duty aluminum foil is worth the extra cost.
Marinated wings keep in the fridge for 24 hours before baking, but fresh is always best. Once baked, they reheat beautifully—350°F for 10 minutes restores that crispy texture. Store leftovers in an airtight container for 3 days, or freeze for 3 months. For parties, double the recipe—they disappear fast. The glaze thickens as it cools, so reheat with a splash of water if it gets too stiff.
Why You'll Love This Recipe
- One-Pan Magic: I swear by this—just wings, honey, and garlic on a sheet pan. Honestly, the only prep is tossing everything in a bowl, and you’re done. No messy sauces or flipping required.
- Sweet-Savory Balance: That sticky honey and sharp garlic? It’s the kind of flavor combo that makes you lick your fingers. The soy sauce ties it all together without overpowering—just rich, caramelized goodness.
- Game for Any Gathering: Between us, these wings work for game day, lazy Sundays, or even a quick weeknight snack. They’re sturdy enough for a crowd but still feel special enough to serve at dinner.
- Budget Meets Leftovers: Chicken wings are cheap, and this recipe stretches easily. I’ll make a big batch, bake half, and save the rest for sandwiches or salads—no waste, all flavor.
Step-by-step instructions for baked honey garlic chicken wings
Here's how to achieve perfectly sticky-glazed wings with crispy edges and juicy meat using simple baking techniques.
👨🍳 Step 1: Prepare the Wings and Make the Marinade
Preheat your oven to 400°F and line two baking sheets with parchment paper. Pat the 2 lb chicken wings dry with paper towels—this is crucial for crispy skin. Separate into drumettes and flats, discarding any excess fat.
In a large bowl, whisk together the 0.5 cup honey, 0.25 cup soy sauce, 2 tbsp olive oil, 2 tbsp brown sugar, 1 tsp ground ginger, 1 tsp ground garlic, 1 tsp salt, and 0.5 tsp black pepper. Add the minced 6 cloves garlic cloves and mix well. The marinade should be thick and glossy—this ensures maximum flavor penetration.
🍳 Step 2: Coat the Wings and Bake for Initial Crisp
Add the chicken wings to the marinade and toss to coat evenly. Let them sit for 10 minutes while you prepare the baking sheets. Place the wings in a single layer on the prepared sheets, leaving 1 inch between each piece to allow for even browning.
Bake for 25 minutes, flipping halfway through, until the wings are golden brown and the skin begins to crisp. You'll notice the marinade bubbling and caramelizing slightly—this is when the sticky glaze starts forming. Rotate the baking sheets if needed for even cooking.
🥘 Step 3: Create the Foil-Sealed Glaze
Remove the wings from the oven and transfer them to a large piece of aluminum foil. Spoon any remaining marinade from the baking sheets over the wings. Fold the foil into a sealed packet, trapping the steam and juices inside. This step is what makes these wings incredibly tender and flavorful.
Return the foil packet to the oven and bake for another 15 minutes. The steam will break down the connective tissue in the chicken, ensuring maximum juiciness. You'll smell the honey and garlic aromas intensifying—this is your cue that the wings are nearly done.
🔥 Step 4: Finish with Extra Crisp and Gloss
Open the foil packet and transfer the wings back to the baking sheets. Increase the oven temperature to 425°F for the final 5-7 minutes of baking. This high heat creates that perfect balance of crispy skin and sticky glaze.
Watch closely during these final minutes—the wings should develop a deep golden-brown color with a glossy, caramelized glaze. The edges should be crispy while the meat remains tender. If the glaze thickens too much, brush with a little extra honey from the marinade.
⏰ Step 5: Rest and Serve
Remove the wings from the oven and let them rest on a wire rack for 5 minutes. This resting period allows the juices to redistribute, preventing them from pooling on your plate. Serve immediately with extra glaze drizzled over the top and a side of fresh vegetables or a cool dip.
The wings should be sticky, caramelized, and perfectly balanced between crispy and tender. Each bite should deliver a perfect combination of sweet honey, savory garlic, and umami from the soy sauce. Enjoy while they're hot for the ultimate experience!
Pro Tips For Making Baked Honey Garlic Chicken Wings
- Pat the Wings Dry: I learned this the hard way—wet wings steam instead of brown. Toss them in paper towels after rinsing, and don’t skip the final wipe-down with fresh towels. That extra 30 seconds makes the honey glaze stick like glue and caramelizes into a proper crust.
- Roast at 425°F First: Start your wings at high heat for 20 minutes—yes, even if the recipe says 375°F. This sears the skin and renders fat fast, so when you lower the temp for the honey glaze, the wings stay crispy instead of soggy. (Pro move: Line your pan with foil for easy cleanup.)
- Minimize Garlic Overlap: Crushed garlic cloves clump under heat, burning before the wings get sticky. Use a microplane to zest just the outer layer (no pulp) or smash whole cloves with the flat side of your knife. Less mess, more flavor—no one wants bitter garlic in their glaze.
- Toss in Olive Oil Twice: After the initial sear, pull the wings and toss them in a fresh tablespoon of olive oil before adding the honey-soy mix. This creates a second crispy layer when it hits the oven, and the oil helps the glaze cling instead of pooling. (Bonus: No sticky fingers when flipping.)
Common mistakes when making great baked honey garlic chicken wings
Overcrowding Trays
Don't stack wings on top of each other or crowd them too closely on your baking sheets. I've seen beginners pack them in like sardines, thinking they'll cook faster—big mistake.
Leave at least 1 inch between each wing for proper air circulation. This ensures even browning and crisping, not steamed, soggy wings. 🔥
Skipping the Rest
Fresh out of the oven, these wings are tempting, but skipping the 5-minute rest on a wire rack means juices will pool on your plate instead of staying inside the meat.
I've learned this the hard way—juicy wings become dry wings when you cut too soon. Trust me, patience pays off here.
Using Wrong Honey
Not all honey is created equal. Thin, runny honey won't caramelize properly, leaving you with a watery glaze instead of that perfect sticky crust. I recommend thick, pure honey like Manuka or clover—these hold their shape and develop rich caramel flavors.
If you must substitute, use maple syrup, but expect slightly different results.
Neglecting the Foil Seal
The foil-sealing step is what makes these wings restaurant-quality, yet many home cooks skip it. Without that steam trap, your wings will dry out and lose their tender texture. I've tested both methods—foil-sealed wings stay juicy, while unsealed wings turn crispy but dry. Don't skip this crucial step!
Overbaking the Final Crisp
That last 5-7 minutes at 425°F is where the magic happens, but it's easy to overdo it. I've seen wings go from perfect to burnt in just 2 minutes.
Watch closely and rotate your pans for even browning. The glaze should be glossy, not charred—golden brown is your target.
Underestimating Marinade Time
While you can coat wings immediately, letting them marinate for even 10 minutes*, (or up to 24 hours) makes a world of difference. The flavors penetrate deeper, and the skin crisps better. I've had readers tell me their wings tasted bland—always let that marinade work its magic**.
Nutrition facts
Frequently asked questions about baked honey garlic chicken wings
Can I make these wings ahead of time?
Yes! Marinate the wings overnight for maximum flavor, then bake them fresh when ready. For leftovers, store in an airtight container for 3 days or freeze for 3 months. To reheat, bake at 350°F for 10 minutes—this restores crispiness. The glaze may thicken slightly when reheated, so add a splash of water if needed.
What if my honey glaze isn't sticky enough?
If the glaze is too thin, simmer 1 tbsp cornstarch with 1 tsp water until thickened, then brush over the wings. For extra stickiness, bake at 425°F for 2-3 minutes longer—this caramelizes the sugars. Avoid overbaking, or the glaze may burn.
Can I use boneless wings instead?
Boneless wings work, but the texture will be different—less crispy and more tender. For best results, use boneless, skinless chicken thighs cut into strips. Reduce baking time to 15-20 minutes total (no foil seal needed). The honey-garlic flavor still shines, but the texture won't be as dramatic.
How can I make these wings spicier?
Add 1/2 tsp cayenne pepper or 1 tsp red pepper flakes to the marinade. For extra heat, sprinkle 1 tbsp sriracha on the wings before the final 5 minutes of baking. Balance the spice with a cooling dip like ranch or blue cheese. Adjust to taste—start with less if you're sensitive to heat!
Why did my wings turn out dry?
Dry wings usually mean skipping the foil-seal step or overbaking. Always use the foil to trap steam for 15 minutes mid-cooking. Check doneness at 425°F—wings should reach 165°F internal temp. Avoid cutting too soon; let them rest 5 minutes before serving. Patience keeps them juicy!