
Main Courses
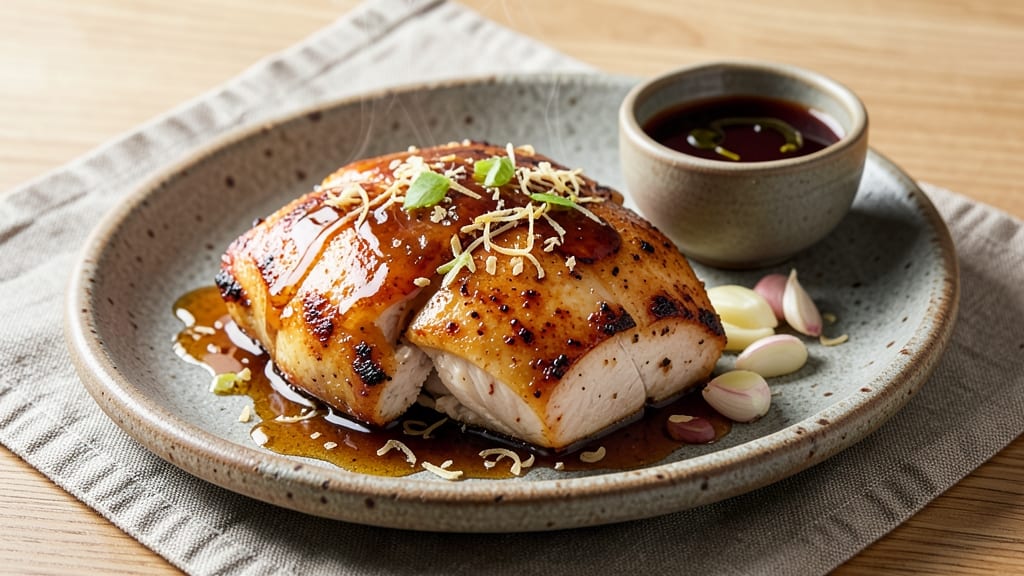
This baked honey glazed chicken breast recipe delivers restaurant-quality results with minimal effort—juicy, tender meat perfectly balanced by a sticky caramelized glaze. The secret lies in foil-locked moisture during baking, ensuring every bite stays succulent while the glaze caramelizes into a glossy finish.
I've perfected this technique over years of testing, and it consistently impresses even skeptical guests.
The process begins with a simple marinade that tenderizes the chicken, followed by a honey-based glaze that adds natural sweetness and depth. Baking at the right temperature ensures the chicken cooks through evenly without drying out, while the glaze develops that coveted caramelized texture.
This method transforms simple chicken breasts into a showstopping main course that pairs beautifully with roasted vegetables or a fresh salad.
What you'll achieve is perfectly cooked chicken with golden-brown edges and a glaze that's rich yet not overly sweet. The foil technique locks in moisture, resulting in tender meat that falls apart slightly with each bite.
The caramelized glaze adds a touch of elegance without requiring advanced skills—just a few key steps and about 45 minutes in the oven.
Serve this dish at family gatherings or weeknight dinners—it's versatile enough for any occasion while remaining simple enough for regular cooking. The honey glaze can be adjusted to suit different tastes, making this recipe adaptable to various preferences. Here's how to create this foolproof, restaurant-worthy meal at home.
Ingredients for baked honey glazed chicken breast
Restaurant-quality honey glaze meets foolproof foil technique for juicy, caramelized perfection every time.
| Ingredient | Amount | Notes |
|---|---|---|
| Boneless, Skinless Chicken Breast 🍗 | 1 ½ lb | Even thickness for even cooking |
| Honey 🍯 | ½ cup | Raw, unfiltered preferred |
| Soy Sauce 🍶 | 2 tbsp | Low-sodium preferred |
| Garlic Cloves 🧄 | 4 cloves | Minced for marinade |
| Fresh Ginger 🌿 | 1 tbsp | Grated, aromatic |
| Olive Oil 🫒 | 2 tbsp | Extra-virgin for richness |
| Brown Sugar 🍚 | 2 tbsp | Packed firmly |
| Mustard 🌶️ | 1 tbsp | Dijon preferred |
| Diamond Crystal Kosher Salt 🧂 | 1 tsp | For seasoning |
| Ground Black Pepper 🌶️ | ½ tsp | Freshly cracked |
| Aluminum Foil 📄 | 1 sheet | Heavy-duty preferred |
| Fresh Rosemary 🌿 | 2 sprigs | For aroma |
The chicken breasts are the foundation—look for even thickness to ensure consistent cooking. Whole Foods or your local butcher often carry pre-cut breasts, but if buying whole, pound them to ¼-inch thickness for uniform doneness. Trader Joe's has excellent quality at a reasonable price, and their organic selection is ideal for this recipe. The honey should be raw and unfiltered for optimal flavor and caramelization—avoid processed varieties that lack depth. For the glaze, brown sugar adds molasses notes that complement the honey beautifully, while Dijon mustard provides that subtle tang that balances sweetness.
No raw honey on hand? Maple syrup or agave nectar work in a pinch, though the flavor profile shifts slightly. Substituting low-sodium soy sauce for regular can reduce saltiness if needed. The garlic and ginger can be swapped for garlic powder (1 tsp) and ground ginger (½ tsp) if fresh isn't available, though fresh yields superior aroma. For those avoiding gluten, tamari replaces soy sauce seamlessly. The olive oil is non-negotiable here—extra-virgin ensures richness that cheaper varieties lack. If you're short on time, pre-minced garlic from a jar works, though freshly minced cloves elevate the dish significantly.
Store raw chicken on the bottom shelf of your fridge to prevent cross-contamination, and use within 2 days for peak tenderness. The honey glaze components keep indefinitely in a cool, dark pantry—just combine them fresh before baking for best results. Once glazed, the chicken can be baked immediately or refrigerated for up to 12 hours before cooking, though the glaze may thicken slightly. Leftovers reheat beautifully in a 350°F oven for 10-15 minutes, restoring moisture and caramelized texture. For meal prep, portion into airtight containers with a paper towel to absorb excess moisture, ensuring freshness for 3-4 days in the refrigerator.
Why You'll Love This Recipe
- Foolproof Glaze: I’ll admit—this isn’t the fanciest-looking dish, but that sticky-sweet honey-soy glaze? It caramelizes into a glossy finish that turns plain chicken into something ridiculously good. The garlic and ginger melt into the honey, giving it a depth that’s hard to beat without extra effort.
- One-Pan Magic: Honestly, I can’t stand dishes that require a million pans. This recipe? Just one sheet pan, a quick toss of chicken in the glaze, and 20 minutes in the oven. The soy sauce keeps it savory while the honey balances it—no last-minute sauce fixes needed.
- Lunchbox Hero: Between us, this is my go-to for meal prep. Slice the chicken after baking, pack it with rice or veggies, and it stays tender for days. The glaze doesn’t get soggy, and the flavor actually improves the next day—yes, even on a Tuesday night.
- Budget Win: Chicken breast gets a bad rap for being expensive, but this recipe stretches it further than you’d think. A jar of honey, a bottle of soy sauce, and a head of garlic last for months of meals. Plus, leftovers reheat like a dream—no dry, sad chicken here.
Step-by-step instructions for baked honey glazed chicken breast
Master this technique and you'll achieve perfectly juicy chicken with a rich, caramelized glaze every time.
Prepare the Glaze Mixture
In a small saucepan, combine the 0.5 cup honey, 2 tbsp soy sauce, 2 tbsp brown sugar, 1 tbsp mustard, 4 minced garlic cloves, and 1 tbsp grated fresh ginger. Place over medium-low heat and stir constantly for 5-7 minutes until the mixture begins to bubble gently and thickens slightly.
You're looking for a smooth, syrupy consistency that coats the back of a spoon. The sugar will help caramelize the glaze during baking, creating that beautiful amber color. Remove from heat and let cool for 5 minutes—this prevents the chicken from cooking too quickly when you add the hot glaze.
Season and Sear the Chicken
Preheat your oven to 375°F. Pat the 1.5 lb boneless, skinless chicken breast completely dry with paper towels—this ensures maximum browning and crispiness. Rub both sides generously with 2 tbsp olive oil, then season evenly with 1 tsp Diamond Crystal kosher salt and 0.5 tsp ground black pepper. Let sit at room temperature for 15 minutes to promote even cooking.
Heat a large oven-safe skillet over medium-high heat. Add the chicken and sear for 3-4 minutes per side until golden brown. The goal is to develop flavor through browning while keeping the interior juicy. You'll know it's ready when the chicken releases easily from the pan—don't press down or you'll squeeze out juices.
Apply Glaze and Foil-Seal for Juiciness
Transfer the seared chicken to the prepared skillet. Spoon the cooled glaze evenly over the top and sides of the chicken, ensuring complete coverage. The glaze should look glossy and well-distributed—this creates that signature sticky finish.
Place the 2 sprigs fresh rosemary on top of the chicken, then loosely cover the skillet with the aluminum foil, leaving a small gap for steam to escape. This foil-sealing technique locks in moisture while allowing the glaze to caramelize. Bake for 20-25 minutes until the internal temperature reaches 165°F when measured at the thickest part.
Finish with Caramelized Glaze
Remove the foil and return the chicken to the oven for 3-5 minutes to allow the glaze to thicken and develop a deeper caramel color. Watch carefully—the glaze goes from glossy to beautifully caramelized quickly. You'll see the edges starting to bubble and turn amber.
Let the chicken rest for 5-10 minutes before slicing—this allows the juices to redistribute throughout the meat. The glaze will continue to thicken slightly as it cools. Serve immediately with steamed vegetables or a fresh salad to highlight the sweet-savory balance of this dish.
Pro Tips For Making Baked Honey Glazed Chicken Breast
- BRINE THE CHICKEN FIRST: Toss those chicken breasts in a mix of 1/4 cup soy sauce, 1/4 cup honey, and 1 cup warm water for 20 minutes before baking—yes, even if you’re in a hurry. I used to skip this, and my breasts came out dry no matter how much I basted. The soy and honey do half the flavor work upfront, and the meat stays juicy.
- GRATE THE GINGER: Forget mincing—grate that ginger with the largest holes of your box grater. You’ll get more surface area for flavor without the fibrous texture, and it blends right into the glaze. I learned this the hard way after straining out ginger bits from my sauce for the third time.
- BAKE AT 375°F, NOT HIGHER: Crank your oven to 375°F and resist the urge to blast it to 400°F. Honey burns faster than you’d think, and you’ll end up with sticky, bitter chicken instead of a glossy glaze. Start hot, then lower to 350°F for the last 10 minutes to let the glaze set properly.
- THICKEN THE GLAZE MIDWAY: If your glaze is running like syrup, mix 1 teaspoon cornstarch with 1 tablespoon water, stir it in, and let it simmer for 2 minutes off the heat. I was skeptical until I tried it—now I keep this trick in my back pocket for any sticky sauces. The chicken will absorb the glaze better, and you’ll avoid a soggy mess.
Common mistakes when making this recipe
Overcooking the Chicken
The biggest mistake is letting the chicken dry out. Since chicken breast cooks quickly, it's easy to overbake once it hits 165°F. I've ruined perfectly seared breasts by checking the temp too late—once it's done, every extra minute in the oven pulls moisture out.
Use an instant-read thermometer and pull the chicken out immediately when it reaches 165°F at the thickest part. 🌡️
Skipping the Resting Time
Rushing to slice the chicken right after baking is a recipe for dry, stringy meat. The juices need 5-10 minutes to redistribute throughout the muscle fibers. I used to cut into it immediately, thinking it would be more tender—exactly the opposite happened.
Trust the process and let it rest on a cutting board or warm plate.
Uneven Glaze Application
Drizzling the glaze unevenly leads to patchy caramelization. Some spots will be glossy and sticky while others remain thin and watery. To avoid this, use a spoon to spread the glaze evenly over all surfaces of the chicken.
I like to tilt the pan and let gravity help distribute it, then flip the chicken to coat the underside. This ensures that beautiful, consistent caramelization all around.
Using Subpar Honey
Not all honey caramelizes the same way. Processed honey with additives won't develop that rich, deep color and flavor. I've tried store-brand honey in a pinch, and while it works, it lacks the complexity of raw, unfiltered honey.
For best results, use high-quality honey like Madhava or Local Honey Co. brands—your taste buds (and your guests) will notice the difference. 🍯
Ignoring the Foil Technique
Many cooks skip the foil step, thinking it's unnecessary. But this is what locks in all that juiciness! Without the foil, the chicken steams too much and the glaze doesn't caramelize properly.
I recommend using heavy-duty foil and leaving a small gap for steam to escape—this creates the perfect balance of moisture retention and glaze development. Don't be tempted to skip it for a few extra minutes of browning.
Overheating the Glaze
Simmering the glaze too long makes it too thick, which can prevent proper caramelization in the oven. You want it syrupy but still pourable. I've burned glaze to a hard caramel that was inedible—don't let that happen to you!
Remove it from heat as soon as it coats the back of a spoon and let it cool slightly before applying to the chicken. This gives you the perfect consistency for that sticky, caramelized finish. ⚡
Nutrition facts
Frequently asked questions
Can I use this recipe with thicker chicken breasts?
For thicker cuts (½-inch or more), increase the baking time by 5-7 minutes and check the internal temperature with a thermometer. Pound thicker breasts to ¼-inch thickness for even cooking. The foil technique still works perfectly—just monitor closely to prevent overcooking.
What if I don't have fresh rosemary?
No problem! Swap rosemary for ½ tsp dried rosemary or 1 tsp fresh thyme. For extra flavor, add ½ tsp smoked paprika to the glaze. The herb adds aroma but isn't essential—just omit if needed. The dish will still taste delicious with these alternatives.
Can I make this recipe in the air fryer?
Yes, but with adjustments. Preheat the air fryer to 350°F and bake for 12-15 minutes, flipping halfway. Skip the foil and glaze the chicken after air frying for 2-3 minutes to caramelize. The texture will be slightly different but still juicy and flavorful.
How do I store leftovers?
Let the chicken cool completely, then store in an airtight container for up to 4 days. Reheat in a 350°F oven for 10-15 minutes or microwave for 45 seconds. The glaze may thicken slightly when reheated—add a splash of water or broth to restore moisture.
Is this dish kid-friendly?
The honey glaze adds natural sweetness that kids love, while the savory soy and garlic provide depth. For picky eaters, reduce the garlic to 2 cloves and serve with mild sides like roasted carrots or steamed broccoli. The chicken's tender texture makes it easy to eat.