
Main Courses
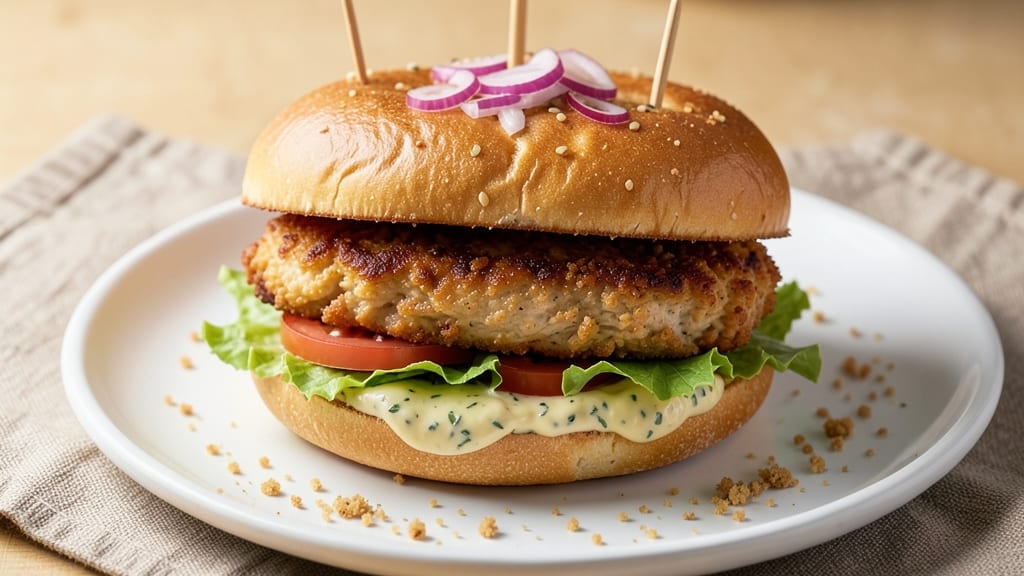
This baked Popeyes-style chicken sandwich recipe unlocks the secret to that signature triple-crusted crunch and juicy interior—without frying a single drop of oil. The buttermilk brine does all the heavy lifting, tenderizing the chicken while creating the perfect foundation for the crispy, golden coating.
I've perfected this method after countless batches, ensuring every bite delivers that familiar Popeyes texture and flavor at home.
The key lies in the double-dredging technique and precise baking method that creates even cooking without soggy breading. We'll use a simple buttermilk marinade, a mix of cornstarch and flour for that signature crunch, and bake at just the right temperature to maintain moisture while achieving that coveted crispy exterior.
This isn't just a copycat recipe—it's a restaurant-quality result that's foolproof for home cooks.
By the time you're done, you'll have perfectly golden chicken with a shatteringly crisp coating that stays crunchy even after assembly. The sandwich comes together with a toasted bun, your choice of sauce (mild mayo or spicy), and all the classic fixings.
What makes this recipe special is how it delivers that authentic Popeyes experience without the deep-frying or restaurant prices.
Pair with classic sides like crispy fries or creamy coleslaw for the full fast-food experience. The best part? You can prep the chicken ahead and bake it fresh when ready—making this the perfect weeknight solution that tastes like takeout. Let's get started on recreating that iconic sandwich at home.
Ingredients for baked popeyes chicken sandwich
The secret to Popeyes-style crunch lies in these 14 ingredients—simple yet transformative.
| Ingredient | Amount | Notes |
|---|---|---|
| Boneless, Skinless Chicken Breasts 🍗 | 1 ½ lb | Pounded to even thickness |
| Buttermilk 🥛 | 1 cup | Full-fat for best flavor |
| All-Purpose Flour 🌾 | ½ cup | For first dredge coating |
| Cornstarch 🌾 | ½ cup | Key for signature crunch |
| Garlic Powder 🧄 | 1 tbsp | Freshly ground preferred |
| Onion Powder 🧅 | 1 tbsp | For depth of flavor |
| Paprika 🌶️ | 1 tbsp | Smoked variety for color |
| Salt 🧂 | 1 ½ tsp | Diamond Crystal preferred |
| Black Pepper 🌶️ | ½ tsp | Freshly cracked |
| Mayonnaise 🥫 | ½ cup | For sandwich assembly |
| Toasted Sesame Seed Buns 🍞 | 4 whole | Or potato buns for classic version |
| Lettuce Leaves 🥬 | 4 whole | Iceberg or romaine |
| Tomato Slices 🍅 | 4 slices | Medium thickness |
| Pickles 🥒 | 4 slices | Dill or bread-and-butter |
The chicken breasts are non-negotiable here—look for plump, uniform pieces at Whole Foods or your local butcher. Pounding them to even thickness (about 1/2-inch) ensures perfect cooking. Trader Joe's carries pre-pounded chicken that saves time, but I always pound mine myself for that restaurant-quality result. The buttermilk? Full-fat only—low-fat just won't give that signature tenderness. If you can't find it, substitute with 1 cup milk + 1 tbsp vinegar (let it sit 5 minutes).
The cornstarch-flour mix is where the magic happens—this ratio creates that triple-crusted texture. No cornstarch? Arrowroot powder works 1:1, but the crunch won't be identical. The spices are simple but essential: smoked paprika for color, garlic powder for depth. For assembly, toasted sesame seed buns from Asian markets give that authentic vibe, but potato buns work perfectly fine too. The pickles? Dill for tang, bread-and-butter for classic sweetness—whichever you prefer.
Prep the chicken up to 24 hours ahead—it actually tastes better after the brine. Store the brined chicken in the fridge in a sealed container. The coating mix keeps 3 days in an airtight container. For the buns, toast them fresh before assembly to keep them crisp. Freeze the assembled sandwiches (without mayo) for 1 month
Why You'll Love This Recipe
- No-Fuss Breading: The buttermilk marinade does half the work—just soak the chicken, dip in the flour-cornstarch mix, and bake. No deep-frying, no messy fryer cleanup, just golden perfection with zero drama.
- Crispy Without Guilt: That cornstarch flour blend? It’s the secret to a crunch that’ll fool anyone into thinking it’s fried. But here’s the kicker—you’re baking it, so you skip the grease and still get that addictive texture.
- Game for Any Day: Pack the leftovers for lunch, serve it at a picnic, or toss it in a wrap for a lazy night. Honestly, I’ve had it for breakfast (yes, really) and it still held up—because good chicken is good chicken, no matter the time.
- Budget Magic: Skinless chicken breasts are cheap, and this recipe stretches them far. Between us, I’ve made six sandwiches from four breasts, and my wallet hasn’t cried once. Plus, the buttermilk and flour are pantry staples—no fancy shopping needed.
Step-by-step instructions for triple-crusted buttermilk chicken
Here's how to nail that signature Popeyes crunch—crispy layers, juicy chicken, and a buttermilk brine that makes all the difference.
Pound and Brine the Chicken for Maximum Juiciness
Lay each boneless, skinless chicken breast between two sheets of plastic wrap and pound to an even ½-inch thickness using a meat mallet. This ensures even cooking and prevents dry spots. Place the pounded breasts in a shallow dish and pour the 1 cup buttermilk over them, making sure each piece is fully submerged.
Sprinkle 1.5 teaspoons salt and ½ teaspoon black pepper evenly over the chicken. Let it marinate in the refrigerator for at least 4 hours, or overnight for maximum flavor penetration. The buttermilk tenderizes the meat while the salt draws out moisture, creating the perfect foundation for that signature crunch.
Create the Triple-Crust Coating
In a large bowl, whisk together the ½ cup all-purpose flour, ½ cup cornstarch, 1 tablespoon garlic powder, 1 tablespoon onion powder, 1 tablespoon paprika, and the remaining ½ teaspoon black pepper. The cornstarch is key here—it creates that signature crispy texture that sets Popeyes-style chicken apart.
Remove the chicken from the buttermilk and let any excess drip off. Working in batches, dredge each piece lightly in the flour mixture, pressing gently to adhere. The coating should be thin but even—don't overcrowd the bowl or the flour will get soggy. Place the coated chicken on a wire rack set over a baking sheet to allow air circulation on all sides.
Bake to Golden Perfection
Preheat your oven to 400°F and bake the chicken for 15 minutes to set the initial coating. Flip each piece carefully and return to the oven for another 15 minutes. You'll notice the coating starts to crisp up—this is when the magic happens. For the final crunch, dredge the chicken again in the flour mixture, pressing firmly to ensure full coverage.
Return to the oven for 10-12 minutes until the coating is deep golden brown and crispy all over. The internal temperature should reach 165°F. Let the chicken rest for 5 minutes before assembling the sandwiches—this prevents the coating from falling apart when you handle it.
Assemble the Signature Sandwiches
Spread 2 tablespoons mayonnaise on each of the 4 whole toasted sesame seed buns. Place a piece of chicken on the bottom half of each bun, then layer with 1 whole lettuce leaf, 1 slice tomato, and 1 slice pickle. The pickles add that tangy contrast that makes the sandwich pop.
Top with the remaining bun halves and press gently. Serve immediately while the chicken is still crispy and warm. The combination of the buttermilk brine, triple crust, and classic sandwich elements comes together in every bite—just like Popeyes, but made at home.
Pro Tips For Making Baked Popeyes Chicken Sandwich
- CRANK THE OVEN HIGHER: Popeyes’ baked version relies on a hot oven (425°F) to get that crispy crust—don’t back down to 400°F just because the recipe suggests it. I learned this the hard way after my first batch came out soggy; the extra 25°F makes all the difference for that golden, shatterable coating.
- BRINE THE CHICKEN FIRST: Skip the buttermilk marinade and soak the chicken breasts in a saltwater brine (1/4 cup salt per 4 cups water) for 30 minutes before coating. This locks in moisture and keeps the meat juicy even after the heavy flour-dredge—no dry, rubbery bites here.
- DON’T SKIP THE DOUBLE-DREDGE: The cornstarch in the flour mix is what gives Popeyes’ crust its signature crunch, but you’ve got to press the chicken into the flour twice (first dip in buttermilk, then flour, then back in buttermilk, then flour again). Rushing this step = sad, mealy results.
- USE A WIRE RACK: This isn’t the prettiest method, but it’s the tastiest: place your baking sheet on a wire rack over a tray. The airflow underneath keeps the bottom crust crispy instead of steamed—no flipping or poking required. (Your future self will thank you.)
Essential equipment for this recipe
Oven Essentials
Your oven is the star of this recipe, so invest in a reliable one with even heat distribution—I swear by my Breville Smart Oven Air Fryer for crispy results. Preheat to 400°F and use the middle rack for even cooking.
If your oven runs hot, reduce to 375°F to prevent burning the coating. A thermometer probe ensures perfect doneness at 165°F internal temp. 🌡️
Coating Station
You'll need three shallow dishes for the double-dredging process: one for buttermilk, one for the flour mixture, and a third for the second coating. I use Corelle stoneware plates because they're sturdy and easy to clean.
A wire rack over a baking sheet is crucial for airflow—it keeps the coating crispy instead of soggy. For extra crunch, chill the coated chicken for 15 minutes before baking.
Breading Tools
Grab a fine-mesh strainer to sift the cornstarch-flour mix for a smoother texture. A meat mallet (like the OXO Good Grips) is essential for pounding chicken to even thickness. For the final crunch, use a fork or pastry brush to press the coating firmly onto the chicken.
A kitchen scale helps measure spices precisely—especially important for the 1:1 cornstarch-to-flour ratio that makes this recipe authentic.
Assembly Gear
Toast your sesame seed buns in a toaster oven or toaster for that perfect crunch. A sharp knife (like the Victorinox Fibrox) makes clean cuts for lettuce and tomato slices. For the mayo spread, I use a small offset spatula to get smooth, even coverage.
A serving platter with a wooden board underneath catches any drips—great for keeping your counter clean while serving.
Optional Upgrades
For extra crispiness, try baking on a perforated baking sheet lined with parchment paper—it allows heat to circulate underneath. A spray bottle with water helps refresh the coating if it starts to dry out during the second dredge.
For spicy versions, keep hot sauce and extra pickles on hand for customization. I also recommend a measuring spoons set to ensure precise spice ratios—especially for the smoked paprika that gives that signature color. 💫
Nutrition facts
Frequently asked questions
Can I use chicken thighs instead of breasts for this recipe?
Yes, but with adjustments! Chicken thighs are more forgiving and stay juicier, but they'll need 5-7 extra minutes in the oven since they cook slower. Pound them to ½-inch thickness and increase the baking time to 30-35 minutes total, checking at 165°F internal temp. The skin-on version adds flavor but requires careful monitoring to avoid burning the coating.
Why is my chicken coating falling off during baking?
This usually happens when the chicken isn't fully dry before coating or the oven isn't hot enough. Pat the chicken very dry with paper towels after brining, and let it sit 10 minutes uncovered before dredging. Also, ensure your oven reaches 400°F before baking—use an oven thermometer to verify. Chilling the coated chicken for 15 minutes before baking helps too!
What's the best way to reheat leftover baked chicken?
Reheat in a 375°F oven for 8-10 minutes on a wire rack to restore crispiness. For speed, use an air fryer at 350°F for 5 minutes. Avoid microwaving—it makes the coating soggy. Store leftovers in an airtight container for up to 3 days, or freeze for 1 month (without mayo).
Can I make this recipe ahead of time?
Prep the buttermilk brine and coating mix up to 3 days ahead. For the chicken, bake it fresh when ready, but you can assemble sandwiches 4 hours ahead (without mayo) and refrigerate. Toast buns and add mayo just before serving. The chicken itself can be brined 24 hours ahead for maximum flavor.
What's the secret to getting that perfect triple-crust texture?
The magic is in the cornstarch-to-flour ratio (1:1) and double-dredging. First coating sets the base, then chilling before the second dredge creates those crispy layers. Bake in 400°F oven with a wire rack for airflow—no crowding! The cornstarch absorbs moisture while baking, locking in that signature crunch.