
Main Courses
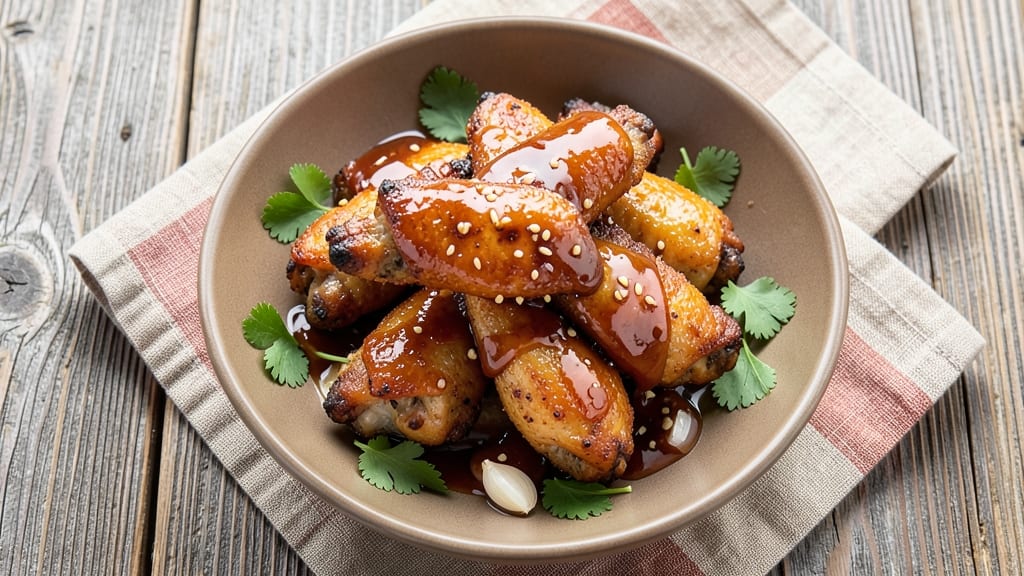
Baked teriyaki chicken wings deliver the perfect balance of crispy edges and sticky-sweet glaze without deep-frying. The secret lies in a homemade teriyaki sauce that caramelizes beautifully during baking, creating a glossy finish that clings to every wing. I developed this recipe after years of testing—no messy frying, just oven magic that transforms simple chicken into a restaurant-worthy dish.
The process starts with marinating the wings in a mix of soy sauce, honey, and garlic, which tenderizes the meat while building flavor. After baking, you brush on the teriyaki glaze while still hot, ensuring it sets into a perfect, crackly crust.
The result? Wings that are crispy on the outside, juicy inside, and coated in a sauce that's tangy, slightly sweet, and deeply savory.
What makes this recipe stand out is the one-bake method—no double-frying or complicated steps. The teriyaki sauce isn't just drizzled on top; it's baked into the wings, creating a texture that's both sticky and crispy.
Serve with a side of steamed rice or fresh vegetables to balance the richness, and you've got a meal that's impressive yet simple to execute.
Perfect for game day, weeknight dinners, or meal prep, these wings stay crispy for hours. The sauce can be adjusted to your sweetness preference, and the method works equally well with boneless wings or drumettes. Let's get started—your taste buds will thank you.
Ingredients for baked teriyaki chicken wings
Game-changers for crispy, sticky-sweet wings—no frying required, just oven magic!
| Ingredient | Amount | Notes |
|---|---|---|
| Chicken Wings 🍗 | 2 lb | Split into drumettes and flats |
| Soy Sauce 🍶 | ½ cup | Low-sodium preferred |
| Honey 🍯 | ⅓ cup | Pure, liquid honey |
| Garlic Cloves 🧄 | 6 cloves | Minced finely |
| Sesame Oil 🫒 | 1 tbsp | Toasted sesame oil |
| Ginger Root 🌿 | 1 tbsp | Freshly grated |
| All-Purpose Flour 🌾 | ½ cup | For coating |
| Cornstarch 🌾 | ¼ cup | For crispiness |
| Salt 🧂 | 1 tsp | Kosher or sea salt |
| Black Pepper 🌶️ | ½ tsp | Freshly ground |
| Garlic Powder 🧄 | 1 tsp | For extra flavor |
| Sesame Seeds 🌾 | 1 tbsp | Toasted for garnish |
| Vegetable Oil 🫒 | 2 tbsp | For spraying |
The chicken wings are the star, so pick fresh, never frozen—the difference in crispiness is huge. I always grab bone-in wings from the butcher section at Whole Foods or Trader Joe's—they're cheaper and taste better. If you're using frozen, thaw them overnight in the fridge. The garlic and ginger? Fresh is non-negotiable—dried just won't cut it here. Toast your sesame seeds in a dry pan for 30 seconds until fragrant—trust me, it makes all the difference.
No honey? Maple syrup works in a pinch, but it's sweeter, so reduce to 2 tbsp. Low-sodium soy sauce? Double-check the label—some brands sneak in extra salt. Running out of cornstarch? Arrowroot powder is a 1:1 swap. The sesame oil adds depth—if you don't have it, toasted peanut oil gives a similar nutty vibe. For extra crispiness, toss the wings in cold water first before coating (this helps the flour stick better). And if you're feeling fancy, add a splash of rice vinegar to the marinade for tang.
These wings stay crispy for 3-4 hours if kept at room temp—perfect for game day. Store leftovers in an airtight container for up to 3 days, but reheat in the oven (not microwave) to keep that crunch. Freeze cooked wings for up to 2 months—just thaw in the fridge overnight. Pro tip: Line your baking sheet with parchment paper and spray it with oil before adding wings. This makes cleanup a breeze and keeps them from sticking.
Why You'll Love This Recipe
- One-Pan Miracle: I swear by this recipe when I’m too tired to scrub pots—just toss the wings on a sheet pan, drizzle that sticky-sweet soy-honey mix, and let the oven do the work. No flipping, no fuss, and honestly? The sesame oil smell alone makes my kitchen feel like a tiny Asian bistro.
- Sweet-Savory Magic: That balance of salty soy, caramelized honey, and sharp garlic? It’s ridiculously good—crispy outside, tender inside, with a glossy glaze that sticks to every bite. (Yes, even on a Tuesday night.)
- Game for Any Gathering: Need a snack for game day? A quick weeknight dinner? A crowd-pleaser for book club? These wings work everywhere—hot out of the oven, chilled in a lunchbox, or reheated for leftovers. I’ve served them all.
- Budget-Friendly Feast: Chicken wings are cheap, and this recipe stretches them far. A single batch feeds four, and the leftovers? Perfect for lunch the next day or freezing for lazy evenings. No wasted ingredients, just pure satisfaction.
Step-by-step instructions for baked teriyaki chicken wings
You're just minutes away from wings with that perfect balance of crispy edges and sticky-sweet glaze—no deep-frying required!
Prep the Wings for Maximum Crispiness
Preheat your oven to 425°F while you prepare the wings. Pat them completely dry with paper towels—this is non-negotiable for crispy skin. I like to split them into drumettes and flats for even cooking. In a large bowl, whisk together 0.5 cup all-purpose flour, 0.25 cup cornstarch, 1 tsp salt, 0.5 tsp black pepper, and 1 tsp garlic powder. The cornstarch is key here—it creates that irresistible crunch.
Toss the wings in the flour mixture until they're evenly coated, shaking off any excess. Arrange them on two parchment-lined baking sheets in a single layer, leaving 1 inch between each piece. This spacing prevents steaming and ensures crispy edges. Lightly spray with 2 tablespoons vegetable oil—just enough to help the coating stick and create a golden finish.
Bake Until Golden and Crispy
Bake the wings for 25 minutes, flipping them halfway through. You want them to be deep golden brown and crispy—this is where all that prep work pays off. Real talk: don't peek too early. The oven needs to maintain its temperature, and opening it too soon can make the wings steam instead of crisp up.
After 25 minutes, remove the wings from the oven and let them cool for 5 minutes on the baking sheets. This resting period is crucial—it prevents the glaze from sliding right off when you add it later. While they cool, you'll make the teriyaki sauce that'll make these wings irresistible.
Make the Glossy Teriyaki Glaze
In a small saucepan, combine 0.5 cup soy sauce, 0.33 cup honey, 1 tablespoon sesame oil, 1 tablespoon freshly grated ginger root, and 6 cloves minced garlic. Bring to a gentle simmer over medium heat, then reduce to low and let it cook for 8-10 minutes, stirring occasionally. You're looking for a thick, syrupy consistency that'll cling beautifully to the wings.
Here's the thing—don't rush this step. The sauce needs time to develop those deep, caramelized flavors. If it starts to get too thick before the time's up, add 1 tablespoon water to loosen it. Once it reaches your desired consistency, remove it from heat and stir in 1 tablespoon toasted sesame seeds for that final crunchy-sweet touch.
Glaze and Finish to Perfection
Return the cooled wings to the oven (no need to preheat again) and brush them generously with the teriyaki glaze. Bake for an additional 5-7 minutes at 425°F, until the glaze is bubbly and the wings are deeply caramelized. This final bake ensures the glaze sets beautifully and those crispy edges stay intact.
For the grand finale, transfer the wings to a serving platter and drizzle any remaining glaze on top. Sprinkle with extra sesame seeds for that restaurant-quality presentation. Serve immediately while the glaze is still glossy and the wings are piping hot. The contrast of crispy, sticky, and savory will have everyone coming back for seconds!
Pro Tips For Making Baked Teriyaki Chicken Wings
- Pat the Wings Dry: Skip the paper towels if you’re in a hurry—just press the wings between clean kitchen towels for 30 seconds. The extra effort makes a real difference when baking; dry wings crisp up faster and soak up the teriyaki glaze better. I learned this the hard way after a batch turned out soggy because I rushed this step.
- Bake in Two Batches: Crowding the tray? Don’t. Bake the wings in two rounds at 425°F (220°C) for 35-40 minutes each, flipping once. The extra space guarantees even browning and prevents steam from turning your crispy wings into sad, sticky dumplings. Yes, it’s an extra oven trip—but your wings will thank you.
- Reduce the Glaze First: Simmer your teriyaki sauce (soy, honey, garlic, sesame oil) in a small pan for 3-4 minutes until it thickens slightly. This step keeps the wings from swimming in a sticky pool while baking. I was skeptical until I tried it—now I double-check the consistency before brushing.
- Add Garlic Late: Toss the minced garlic into the sauce after baking, not before. Raw garlic burns easily and can make the sauce bitter. Instead, brush it on the wings right before serving or mix it into a quick sesame-garlic aioli for dipping. Sounds weird, but it works—your guests won’t even notice the difference.
Best sauces and condiments for baked teriyaki chicken wings
Classic Teriyaki Glaze
The homemade teriyaki sauce in this recipe is where the magic happens—it's what transforms ordinary wings into something truly special. The balance of soy sauce, honey, garlic, and ginger creates a perfect harmony of salty, sweet, and umami flavors.
I like to simmer mine for 8-10 minutes to let those flavors meld together beautifully. 🌟
For extra depth, I add toasted sesame seeds right before serving. They give a nutty crunch that contrasts perfectly with the sticky glaze.
If you want to make this sauce ahead of time, store it in an airtight container in the fridge for up to 5 days—it actually tastes better the next day as the flavors continue to develop.
Spicy Teriyaki Twist
Want to kick things up a notch? Add 1-2 teaspoons of sriracha or 1 tablespoon of gochujang to the sauce while it's simmering. This gives a subtle heat that pairs perfectly with the sweetness.
For a smoky flavor, I sometimes add ½ teaspoon of smoked paprika—it adds an unexpected depth that everyone loves. 🌶️
If you're feeling adventurous, try swapping out half the honey for maple syrup or agave nectar for a slightly different sweetness profile. The sauce will still be delicious, but with a more complex flavor. Just
Sweet and Tangy Variations
For a tangier glaze, add 1 tablespoon of rice vinegar or lemon juice to the sauce. This brightens up the flavors and cuts through the richness. I've also seen people add 1 teaspoon of grated orange zest for a citrusy twist—it's amazing with the honey and soy sauce. 🍋
If you prefer a richer, more complex sauce, try adding 1 tablespoon of mirin or 1 teaspoon of fish sauce (for umami depth). Both additions elevate the teriyaki to a whole new level.
The fish sauce is subtle, so don't worry about overpowering the dish—it just adds a savory depth that's hard to resist.
Dipping Sauces
No teriyaki wings are complete without a dipping sauce! My go-to is a simple mix of 2 tablespoons of soy sauce, 1 tablespoon of honey, and 1 teaspoon of sesame oil, thinned with 1 tablespoon of water.
It's light, tangy, and perfect for soaking up any extra glaze. 🍶
For a spicy dip, blend 2 tablespoons of sriracha, 1 tablespoon of mayo, and 1 teaspoon of lime juice—it's creamy, spicy, and absolutely addictive. Serve it on the side for those who want a little extra kick.
You can also offer both sauces so everyone can choose their favorite! The contrast of flavors makes the wings even more enjoyable.
Nutrition facts
Frequently asked questions
Can I use boneless wings for this recipe?
Yes, but you'll need to adjust the cooking time slightly. Boneless wings cook faster—start checking for doneness at 20 minutes instead of 25 minutes. They also won't be as crispy as bone-in wings, but they still taste amazing! For extra crunch, toss them in panko breadcrumbs instead of flour before baking.
How do I make the sauce thicker or thinner?
For a thicker glaze, simmer the sauce longer or add 1 teaspoon of cornstarch mixed with 1 tablespoon water. For a thinner sauce, add 1 tablespoon water or rice vinegar while simmering. The ideal consistency should coat the back of a spoon but still drip slowly—this ensures it clings beautifully to the wings without pooling.
Why are my wings soggy instead of crispy?
Soggy wings usually mean one of two things: either the wings weren't dry enough before baking, or the oven wasn't hot enough. Always pat them completely dry with paper towels, and make sure your oven reaches 425°F. Another tip: Bake them on a wire rack over a baking sheet instead of directly on parchment—this allows air to circulate for maximum crispiness.
Can I make this recipe ahead of time?
Prepare the wings up to 2 days ahead by coating them in the flour mixture and refrigerating uncovered. When ready to bake, follow the same instructions. For the sauce, make it up to 5 days ahead and store it in an airtight container. Reheat the sauce gently before brushing on the wings—it should be warm but not boiling to avoid melting the glaze too quickly.
What's the best way to reheat leftover wings?
To keep them crispy, reheat in a 400°F oven for 5-7 minutes on a wire rack. Avoid microwaving—they'll turn rubbery. For extra crispiness, broil for 1-2 minutes at the end, watching closely to avoid burning. If you're short on time, toss them in a hot skillet for 30 seconds per side to revive the crunch.